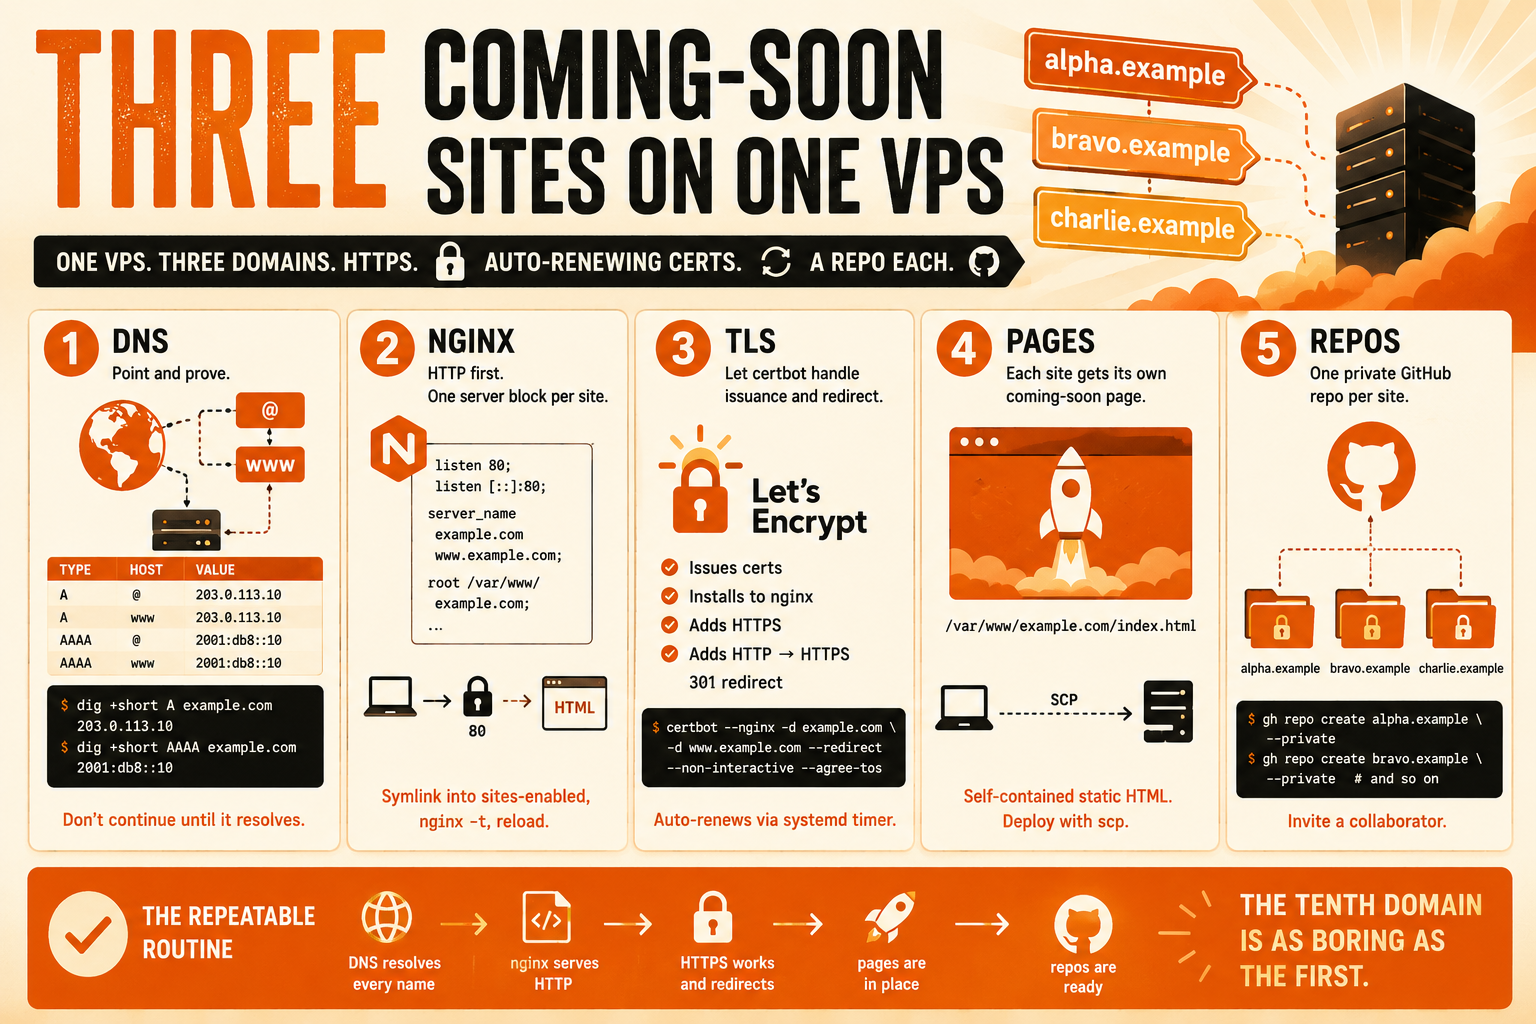
There's a satisfying little corner of web ops where a handful of commands take you from "I just bought a domain" to "it's live, on HTTPS, with auto-renewing certs and version control." This is a walkthrough of doing that for three domains at once on a single VPS — each getting its own nginx server block, its own Let's Encrypt certificate, a distinctive static "coming soon" page, and its own private GitHub repo.
The whole thing is maybe twenty minutes of work once DNS has propagated. The value isn't any single step — it's having a repeatable, verifiable routine so the tenth domain is as boring as the first.
The stack: Debian 12, nginx 1.22, certbot 2.1, the GitHub CLI, and plain static HTML.
The shape of the work
Five phases, each with a verification step before moving on:
- DNS — point apex +
wwwat the box, and prove it resolves. - nginx — one HTTP server block per site, enabled via symlink.
- TLS — let certbot issue certs and rewrite the configs for HTTPS + redirect.
- Pages — a self-contained
index.htmlper site, deployed withscp. - Repos — one private GitHub repo per site, with a collaborator invited.
The recurring theme: never trust a step you didn't verify. Every phase below ends with a command whose output you actually read.
1. DNS, and proving it
For each domain, create four records pointing apex (@) and www at the VPS — an A record for IPv4 and an AAAA for IPv6:
| Type | Host | Value |
|---|---|---|
| A | @ |
203.0.113.10 |
| A | www |
203.0.113.10 |
| AAAA | @ |
2001:db8::10 |
| AAAA | www |
2001:db8::10 |
(Those are documentation-range placeholders — substitute your server's real addresses.)
Before requesting any certificates, confirm every name resolves. certbot's HTTP-01 challenge fails if DNS isn't live yet, and the failure messages are vague enough to waste your afternoon:
for d in example.com www.example.com; do
  printf "%-26s A=%s  AAAA=%s\n" "$d" \
    "$(dig +short A $d | tr '\n' ' ')" "$(dig +short AAAA $d | tr '\n' ' ')"
done
If a name comes back empty, propagation isn't done. Wait, re-run, then proceed.
2. nginx, HTTP first
Start each site as plain HTTP. This isn't laziness — certbot's nginx plugin reads your port-80 server block, then rewrites it in place to add the TLS bits. Give it a clean starting point and it does the tedious part for you.
/etc/nginx/sites-available/example.com:
server {
    listen 80;
    listen [::]:80;

    server_name example.com www.example.com;

    root /var/www/example.com;
    index index.html index.htm;

    location / {
        try_files $uri $uri/ =404;
    }

    # Security headers
    add_header X-Frame-Options "SAMEORIGIN" always;
    add_header X-Content-Type-Options "nosniff" always;
    add_header Referrer-Policy "no-referrer-when-downgrade" always;
    add_header Content-Security-Policy "default-src 'self' http: https: data: blob: 'unsafe-inline'" always;

    # Gzip
    gzip on;
    gzip_vary on;
    gzip_min_length 1024;
    gzip_types text/plain text/css text/xml text/javascript application/x-javascript application/xml+rss;

    # Cache static assets
    location ~* \.(jpg|jpeg|png|gif|ico|css|js|svg|woff2)$ {
        expires 1y;
        add_header Cache-Control "public, immutable";
    }

    # Allow the ACME challenge, deny other dotfiles
    location ~ /\.well-known/acme-challenge/ { allow all; }
    location ~ /\.                           { deny all; }
}
The two location blocks at the end matter: the catch-all /\. dotfile deny would otherwise also block /.well-known/acme-challenge/, which is exactly the path Let's Encrypt needs to reach. Allow it explicitly before the deny.
Enable each site with a symlink and reload:
for d in example.com; do
  ln -sf /etc/nginx/sites-available/$d /etc/nginx/sites-enabled/$d
  echo "<h1>$d — coming soon</h1>" > /var/www/$d/index.html   # placeholder
done

nginx -t && systemctl reload nginx
A real gotcha: one of my domains already had a config sitting in
sites-enabledas a regular file rather than a symlink. Mixed conventions like that are how you end up with a site that mysteriously won't update. I deleted it and re-created it as a symlink so all sites follow the samesites-available→sites-enabledpattern. Pick one convention and let nothing drift from it.
3. TLS, the easy way
certbot's nginx plugin does issuance and installation in one shot. Cover both apex and www in a single cert, and pass --redirect so it also writes the HTTP→HTTPS 301:
for d in example.com; do
  certbot --nginx -d "$d" -d "www.$d" \
    --non-interactive --agree-tos --redirect \
    -m you@example.com
done

nginx -t && systemctl reload nginx
For each site, certbot rewrites the config to:
- add
listen 443 sslfor IPv4 and IPv6, with the cert/key under/etc/letsencrypt/live/<domain>/, - include the recommended
options-ssl-nginx.confandssl-dhparams.pem, - append a second
server {}that 301-redirects port 80 tohttps://.
Renewal is handled by certbot's own systemd timer — there's no cron line to write and nothing to remember. Certs are 90-day; the timer renews them well ahead of expiry.
Verify the whole TLS story in one loop — redirect on 80, 200 on 443, and www behaving:
for d in example.com; do
  echo "=== $d ==="
  curl -sS -o /dev/null -w "  http  -> %{http_code} -> %{redirect_url}\n" "http://$d"
  curl -sS -o /dev/null -w "  https -> %{http_code}\n"                    "https://$d"
  curl -sS -o /dev/null -w "  www   -> %{http_code} -> %{redirect_url}\n" "http://www.$d"
done
You want 301 → https://…, then 200, then 301 again. If you see a 200 on plain HTTP, your redirect didn't land.
4. Pages worth landing on
A "coming soon" page is a tiny canvas, which makes it a fun one. I kept each page a single self-contained index.html — inline CSS and JS, web fonts, no build step. That keeps deployment to a one-line scp and keeps each repo trivially simple. Rather than one shared template, I gave each domain its own character:
- a dark, instrument-panel look with a live oscilloscope trace drawn on a
<canvas>; - a light, editorial layout with slowly drifting topographic contour lines in SVG;
- a retro amber CRT terminal, scanlines and all, that types out a little boot sequence.
All three honor prefers-reduced-motion — if a visitor's OS asks for less animation, the motion stops and the page renders static. That's a one-line media query and there's no excuse to skip it.
Deploy and confirm what's actually being served, not just what's on disk:
for d in example.com; do
  scp "$d/index.html" "vps:/var/www/$d/index.html"
done

for d in example.com; do
  printf "%-24s " "$d"; curl -sS "https://$d" | grep -o '<title>[^<]*</title>'
done
5. A private repo per site
Each site gets its own private GitHub repo, created and pushed straight from the local directory with the GitHub CLI. If you juggle multiple GitHub accounts, set the right one active first:
gh auth switch --user your-account
Then, from each site's directory (holding index.html, a README.md, and a .gitignore):
git init -b main
git add -A
git commit -m "Coming soon page for example.com"

# create the private repo from this directory and push in one step
gh repo create "your-account/example.com" --private --source=. --remote=origin --push

# invite a collaborator with push (write) access
gh api -X PUT "repos/your-account/example.com/collaborators/their-username" -f permission=push
A small thing that trips people up: GitHub repo names may contain dots, so naming the repo example.com — matching the domain exactly — is perfectly valid and keeps the mapping between repo and site obvious.
The collaborator step is worth understanding precisely. On a private repo, adding a collaborator doesn't grant instant access — it creates an invitation. Until the person accepts it (via the email GitHub sends, or the repo page, or their notifications), they're listed as a pending invite, not an active collaborator. So "I added you" and "you can push" are two events with the other person's click in between. Verify the invitation went out with the right permission:
gh api "repos/your-account/example.com/invitations" \
  --jq '.[] | "\(.invitee.login) · \(.permissions)"'
# -> their-username · write
And later, once they've accepted, the pending list empties and this returns their level:
gh api "repos/your-account/example.com/collaborators/their-username/permission" --jq '.permission'
What you're left with
Per domain: HTTPS with an auto-renewing certificate, HTTP and www both 301-ing to the canonical https:// apex, a static page served from /var/www/<domain>/, and a private repo with history. Updating a page later is two independent pushes — one to GitHub, one to the server:
git add index.html && git commit -m "update" && git push
scp index.html vps:/var/www/<domain>/index.html
There's deliberately no CI here; for a coming-soon page, a GitHub Action that deploys on push would be the obvious next increment, and the natural place to grow this into a real pipeline once the actual sites take shape.
The reusable checklist
Strip away the prose and the routine for the next domain is short enough to keep in your head:
- DNS:
A+AAAAfor@andwww→ the box; verify withdig. mkdir -p /var/www/<domain>.- Drop the nginx server block in
sites-available, symlink intosites-enabled. nginx -t && systemctl reload nginx.certbot --nginx -d <domain> -d www.<domain> --redirect.- Build
index.html;scpit up. gh repo create <owner>/<domain> --private --source=. --push.- Invite collaborators; verify visibility, redirects, and a
200on HTTPS.
Eight steps, each with a way to check it worked. That's the whole trick — not the commands themselves, but refusing to move to the next one until the current one is proven.